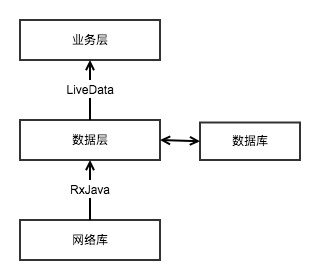
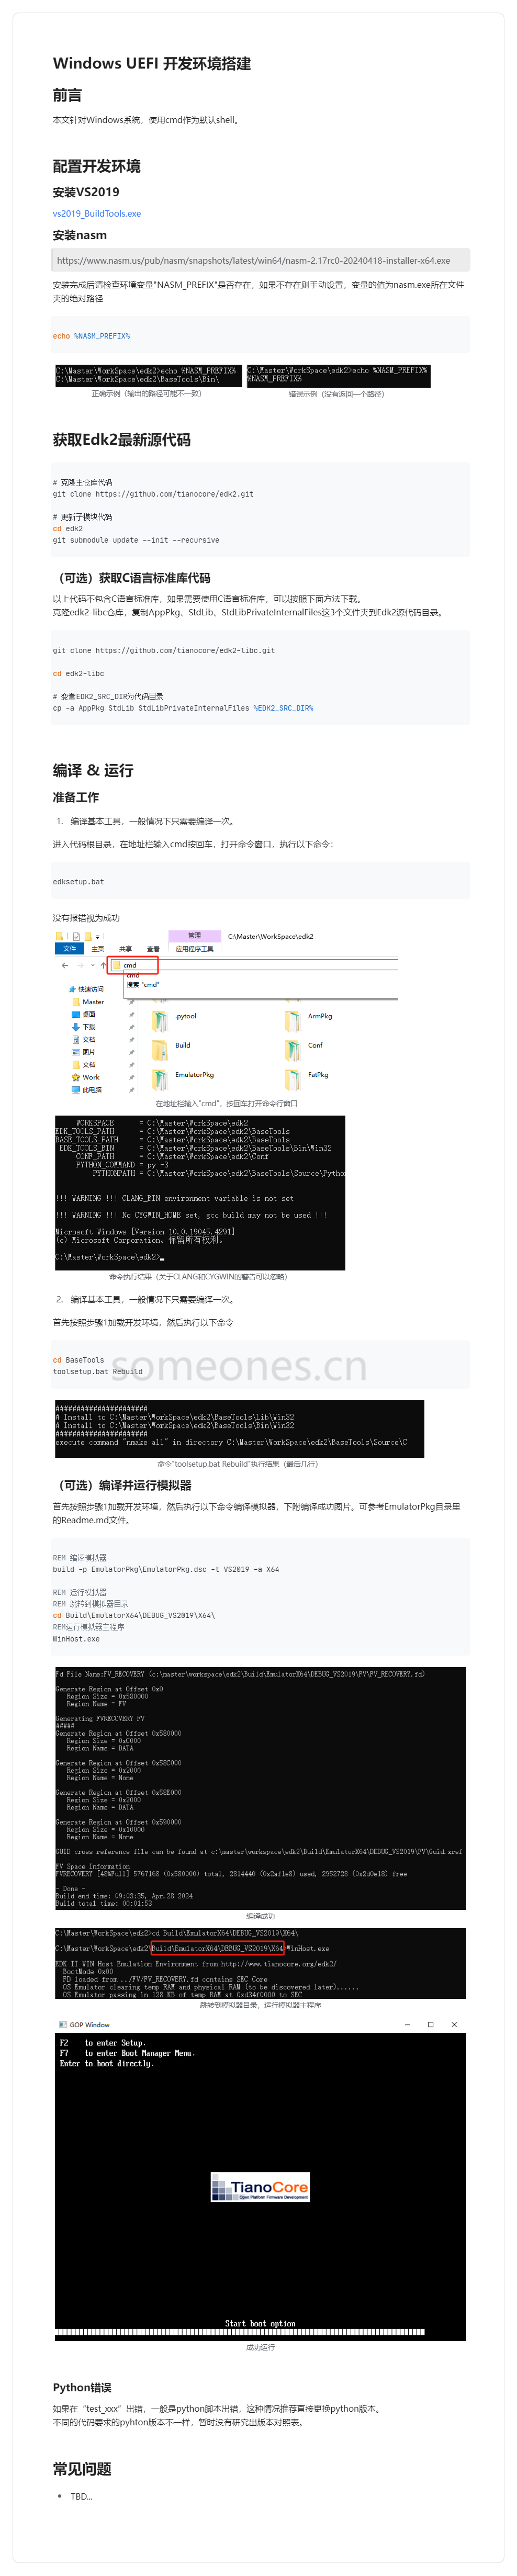
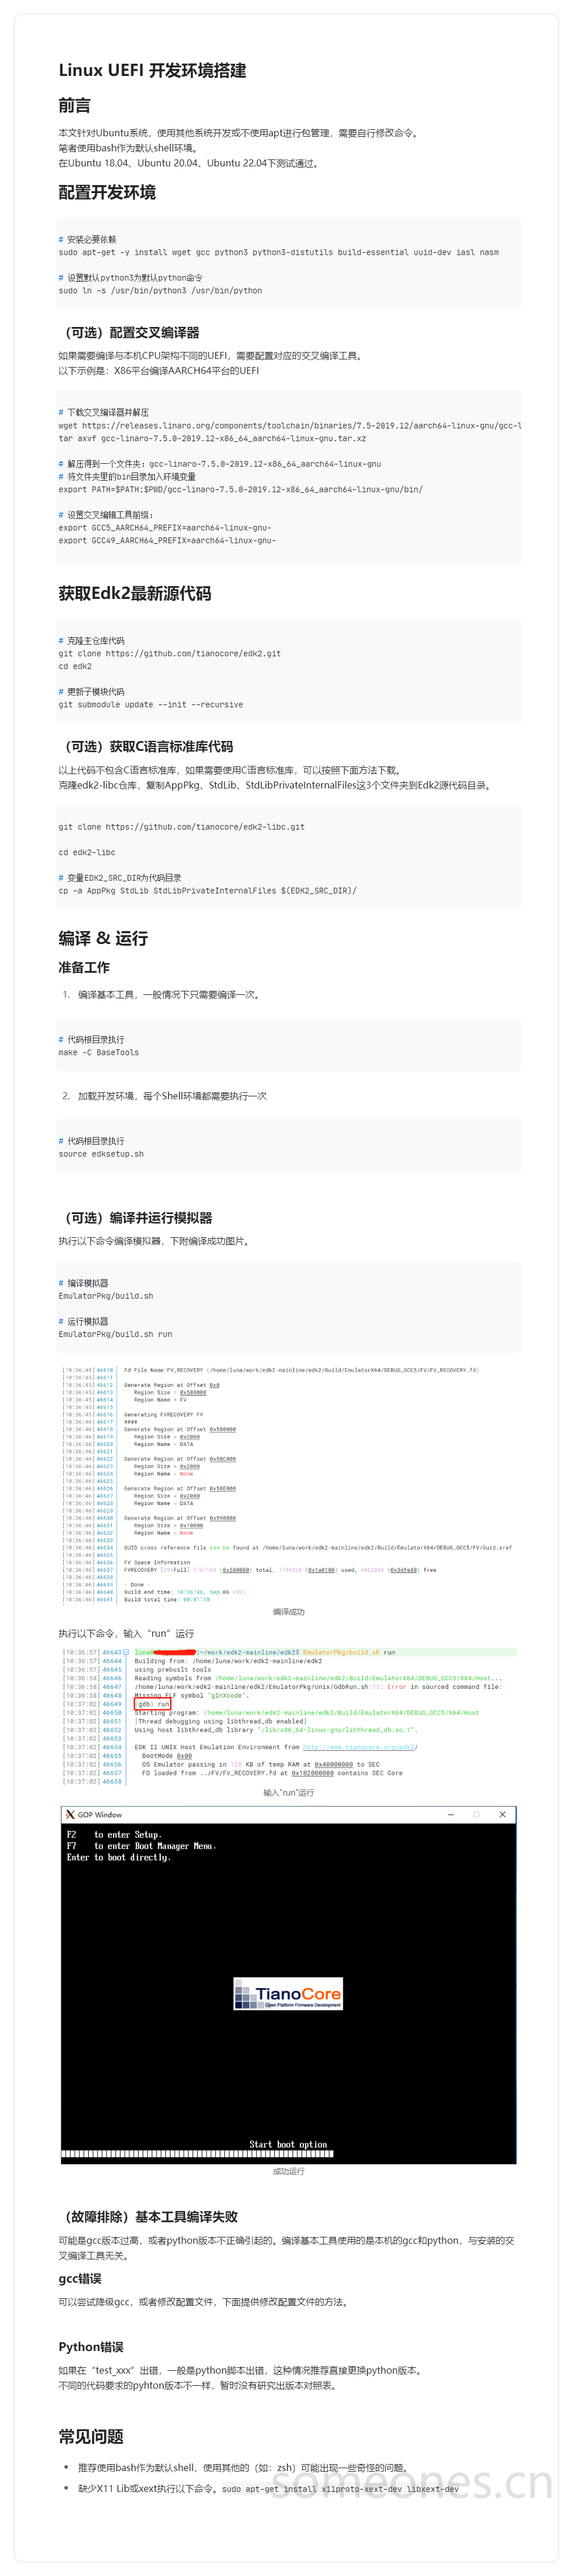
<?xml version="1.0" encoding="utf-8"?>
<feed xmlns="http://www.w3.org/2005/Atom">
  <title>Hello World !</title>
  
  
  <link href="https://someones.cn/atom.xml" rel="self"/>
  
  <link href="https://someones.cn/"/>
  <updated>2024-05-07T09:14:08.622Z</updated>
  <id>https://someones.cn/</id>
  
  <author>
    <name>Someones</name>
    
  </author>
  
  <generator uri="https://hexo.io/">Hexo</generator>
  
  <entry>
    <title>Windows UEFI 开发环境搭建</title>
    <link href="https://someones.cn/2024/04/09/windows-uefi-kai-fa-huan-jing-da-jian/"/>
    <id>https://someones.cn/2024/04/09/windows-uefi-kai-fa-huan-jing-da-jian/</id>
    <published>2024-04-09T04:00:00.000Z</published>
    <updated>2024-05-07T09:14:08.622Z</updated>
    
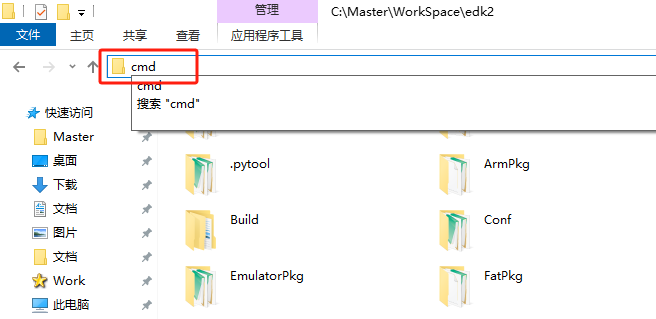
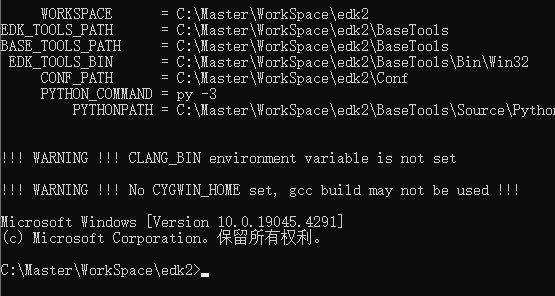
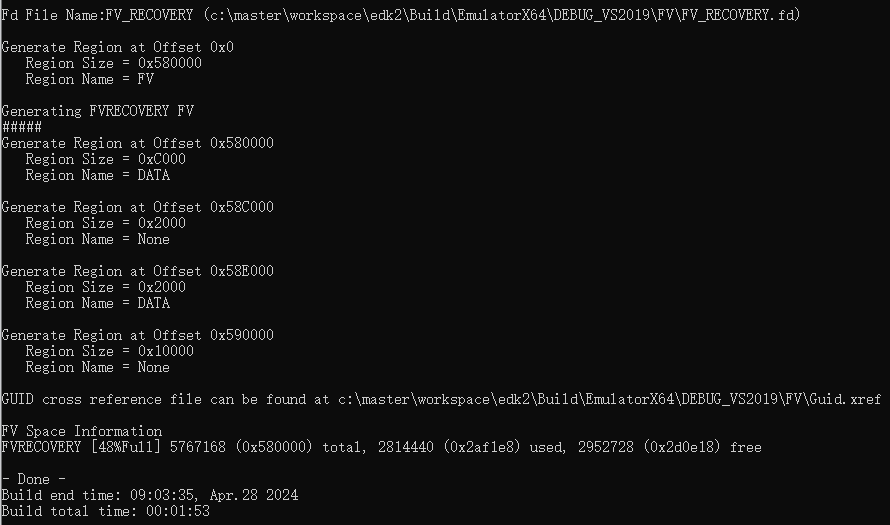
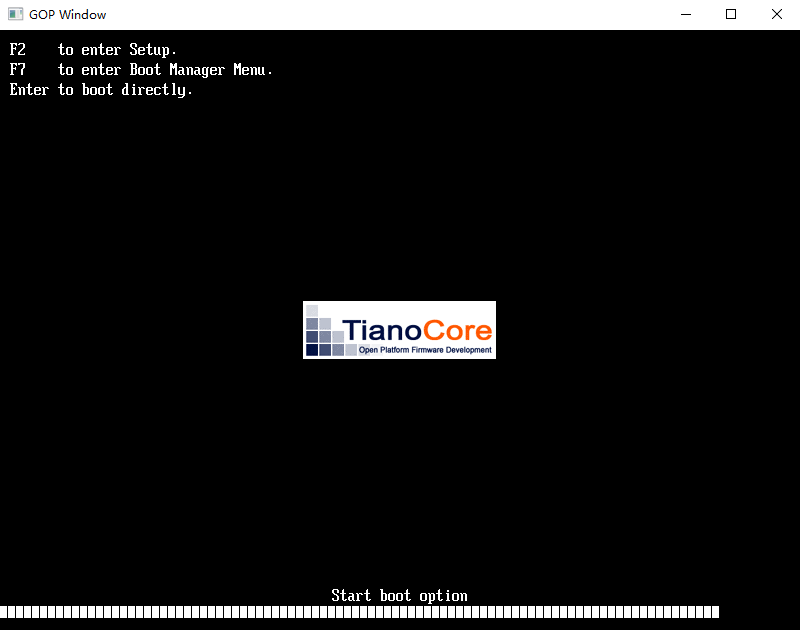
    <content type="html"><![CDATA[<p>图片版</p><blockquote><p><a href="https://static.someones.cn/images/2419b707555e849e3da531db0c19ca7741db9faeffda9727d1f7a4e583117fe1.png">https://static.someones.cn/images/2419b707555e849e3da531db0c19ca7741db9faeffda9727d1f7a4e583117fe1.png</a></p></blockquote><h1 id="前言"><a href="#前言" class="headerlink" title="前言"></a>前言</h1><p>本文针对Windows系统，使用cmd作为默认shell。</p><p>‍</p><h1 id="配置开发环境"><a href="#配置开发环境" class="headerlink" title="配置开发环境"></a>配置开发环境</h1><h3 id="安装VS2019"><a href="#安装VS2019" class="headerlink" title="安装VS2019"></a>安装VS2019</h3><p><a href="assets/vs2019_BuildTools-20240425143712-cmgybjk.exe">vs2019_BuildTools.exe</a></p><h3 id="安装nasm"><a href="#安装nasm" class="headerlink" title="安装nasm"></a>安装nasm</h3><blockquote><p><a href="https://www.nasm.us/pub/nasm/snapshots/latest/win64/nasm-2.17rc0-20240418-installer-x64.exe">https://www.nasm.us/pub/nasm/snapshots/latest/win64/nasm-2.17rc0-20240418-installer-x64.exe</a></p></blockquote><p>安装完成后请检查环境变量”NASM_PREFIX”是否存在，如果不存在则手动设置，变量的值为nasm.exe所在文件夹的绝对路径</p><figure class="highlight cmd"><table><tr><td class="gutter"><pre><span class="line">1</span><br></pre></td><td class="code"><pre><span class="line"><span class="built_in">echo</span> <span class="variable">%NASM_PREFIX%</span></span><br></pre></td></tr></table></figure><p>​<img src="https://static.someones.cn/images/b5f33d54f037028f253512de451c50a13894138ad5d95d21006aa83b9e82b2e1.png" alt="图片" title="正确示例（输出的路径可能不一致）" loading="lazy"><img src="https://static.someones.cn/images/105d2e5381a309f96295c0b8700d3df1afbf6cc4772ea2d9a3eba5b7f3c8b763.png" alt="图片" title="错误示例（没有返回一个路径）" loading="lazy">​</p><p>‍</p><h1 id="获取Edk2最新源代码"><a href="#获取Edk2最新源代码" class="headerlink" title="获取Edk2最新源代码"></a>获取Edk2最新源代码</h1><figure class="highlight cmd"><table><tr><td class="gutter"><pre><span class="line">1</span><br><span class="line">2</span><br><span class="line">3</span><br><span class="line">4</span><br><span class="line">5</span><br><span class="line">6</span><br></pre></td><td class="code"><pre><span class="line"># 克隆主仓库代码</span><br><span class="line">git clone https://github.com/tianocore/edk2.git</span><br><span class="line"></span><br><span class="line"># 更新子模块代码</span><br><span class="line"><span class="built_in">cd</span> edk2</span><br><span class="line">git submodule update --init --recursive</span><br></pre></td></tr></table></figure><h3 id="（可选）获取C语言标准库代码"><a href="#（可选）获取C语言标准库代码" class="headerlink" title="（可选）获取C语言标准库代码"></a>（可选）获取C语言标准库代码</h3><p>以上代码不包含C语言标准库，如果需要使用C语言标准库，可以按照下面方法下载。<br>克隆edk2-libc仓库，复制AppPkg、StdLib、StdLibPrivateInternalFiles这3个文件夹到Edk2源代码目录。</p><figure class="highlight cmd"><table><tr><td class="gutter"><pre><span class="line">1</span><br><span class="line">2</span><br><span class="line">3</span><br><span class="line">4</span><br><span class="line">5</span><br><span class="line">6</span><br></pre></td><td class="code"><pre><span class="line">git clone https://github.com/tianocore/edk2-libc.git</span><br><span class="line"></span><br><span class="line"><span class="built_in">cd</span> edk2-libc</span><br><span class="line"></span><br><span class="line"># 变量EDK2_SRC_DIR为代码目录</span><br><span class="line">cp -a AppPkg StdLib StdLibPrivateInternalFiles <span class="variable">%EDK2_SRC_DIR%</span></span><br></pre></td></tr></table></figure><p>‍</p><h1 id="编译-运行"><a href="#编译-运行" class="headerlink" title="编译 &amp; 运行"></a>编译 &amp; 运行</h1><h3 id="准备工作"><a href="#准备工作" class="headerlink" title="准备工作"></a>准备工作</h3><ol><li>编译基本工具，一般情况下只需要编译一次。</li></ol><p>进入代码根目录，在地址栏输入cmd按回车，打开命令窗口，执行以下命令：</p><figure class="highlight cmd"><table><tr><td class="gutter"><pre><span class="line">1</span><br></pre></td><td class="code"><pre><span class="line">edksetup.bat</span><br></pre></td></tr></table></figure><p>没有报错视为成功</p><p>​<img src="https://static.someones.cn/images/d3dcc85d9ebeeae3adf14ea1a18357fb5d5b4534ae9fec637535527819d1e996.png" alt="图片" title="在地址栏输入&quot;cmd&quot;，按回车打开命令行窗口" loading="lazy">​</p><p>​<img src="https://static.someones.cn/images/225b2952e9cba5347334170fdecaf098ac628a86bcc2ece45096f634eaa313a5.png" alt="图片" title="命令执行结果（关于CLANG和CYGWIN的警告可以忽略）" loading="lazy">​</p><ol start="2"><li>编译基本工具，一般情况下只需要编译一次。</li></ol><p>首先按照步骤1加载开发环境，然后执行以下命令</p><figure class="highlight cmd"><table><tr><td class="gutter"><pre><span class="line">1</span><br><span class="line">2</span><br></pre></td><td class="code"><pre><span class="line"><span class="built_in">cd</span> BaseTools</span><br><span class="line">toolsetup.bat Rebuild</span><br></pre></td></tr></table></figure><p>​<img src="https://static.someones.cn/images/efda783ac58ad80d436a6590112b3336c9b1b23538a82ad14138f0da48ecfdf0.png" alt="图片" title="命令&quot;toolsetup.bat Rebuild&quot;执行结果（最后几行）" loading="lazy">​</p><h3 id="（可选）编译并运行模拟器"><a href="#（可选）编译并运行模拟器" class="headerlink" title="（可选）编译并运行模拟器"></a>（可选）编译并运行模拟器</h3><p>首先按照步骤1加载开发环境，然后执行以下命令编译模拟器，下附编译成功图片。可参考EmulatorPkg目录里的Readme.md文件。</p><figure class="highlight cmd"><table><tr><td class="gutter"><pre><span class="line">1</span><br><span class="line">2</span><br><span class="line">3</span><br><span class="line">4</span><br><span class="line">5</span><br><span class="line">6</span><br><span class="line">7</span><br><span class="line">8</span><br></pre></td><td class="code"><pre><span class="line"><span class="comment">REM 编译模拟器</span></span><br><span class="line">build -p EmulatorPkg\EmulatorPkg.dsc -t VS2019 -a X64</span><br><span class="line"><span class="comment"></span></span><br><span class="line"><span class="comment">REM 运行模拟器</span></span><br><span class="line"><span class="comment">REM 跳转到模拟器目录</span></span><br><span class="line"><span class="built_in">cd</span> Build\EmulatorX64\DEBUG_VS2019\X64\</span><br><span class="line"><span class="comment">REM运行模拟器主程序</span></span><br><span class="line">WinHost.exe</span><br></pre></td></tr></table></figure><p>​<img src="https://static.someones.cn/images/baf19195807df302eba1539f9f80268edca007ed875f5bb71825d504be39bb72.png" alt="编译成功" title="编译成功" loading="lazy">​</p><p>​<img src="https://static.someones.cn/images/5842d3c307d15da7ed1c0481d8d828972ab757c2e7b4d67c74a8b4053495e17d.png" alt="运行模拟器" title="跳转到模拟器目录，运行模拟器主程序" loading="lazy">​</p><p>​<img src="https://static.someones.cn/images/44eca7715af18d71821200dade216e4dd2fb5e6e67768c975da603f8b5f0cc92.png" alt="成功运行" title="成功运行" loading="lazy">​</p><p>‍</p><h4 id="Python错误"><a href="#Python错误" class="headerlink" title="Python错误"></a>Python错误</h4><p>如果在“test_xxx”出错，一般是python脚本出错，这种情况推荐直接更换python版本。<br>不同的代码要求的pyhton版本不一样，暂时没有研究出版本对照表。</p><p>‍</p><h1 id="常见问题"><a href="#常见问题" class="headerlink" title="常见问题"></a>常见问题</h1><ul><li>TBD…</li></ul>]]></content>


    <summary type="html">&lt;p&gt;图片版&lt;/p&gt;
&lt;blockquote&gt;
&lt;p&gt;&lt;a</summary>


    <category term="Notes" scheme="https://someones.cn/categories/Notes/"/>
    
    
    <category term="UEFI" scheme="https://someones.cn/tags/UEFI/"/>
    
    <category term="BIOS" scheme="https://someones.cn/tags/BIOS/"/>
    
  </entry>
  
  <entry>
    <title>Linux UEFI 开发环境搭建</title>
    <link href="https://someones.cn/2023/09/15/linux-uefi-kai-fa-huan-jing-da-jian/"/>
    <id>https://someones.cn/2023/09/15/linux-uefi-kai-fa-huan-jing-da-jian/</id>
    <published>2023-09-15T04:00:00.000Z</published>
    <updated>2024-05-07T09:11:40.503Z</updated>
    
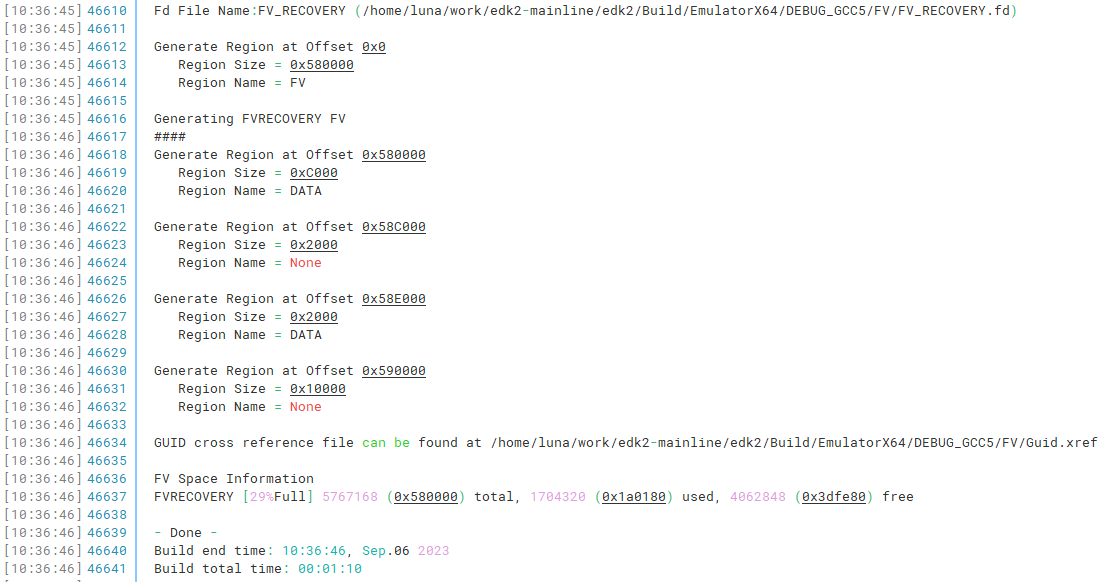
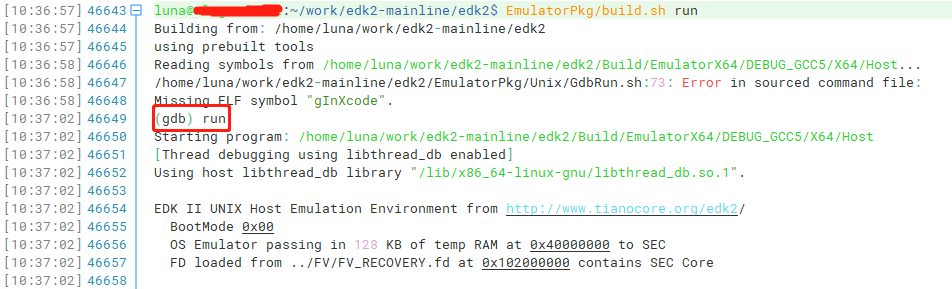
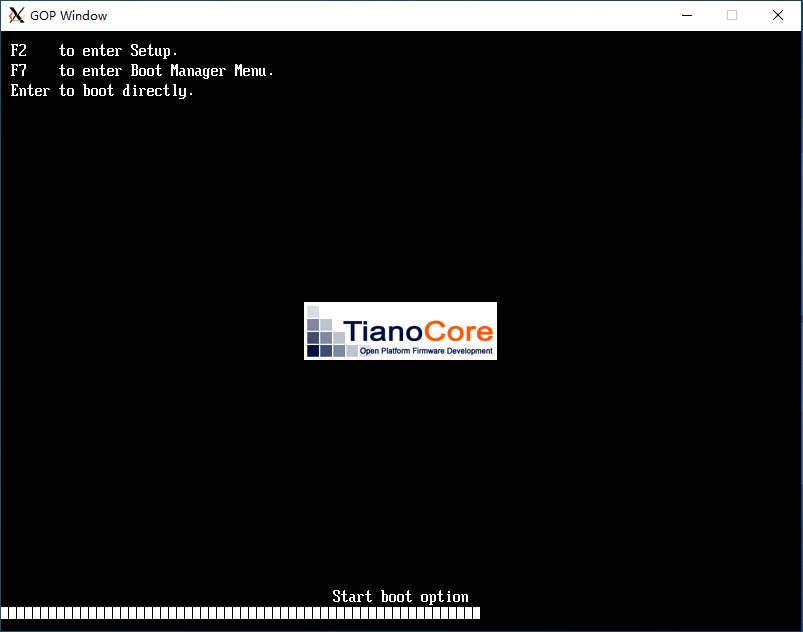
    <content type="html"><![CDATA[<p>图片版</p><blockquote><p>​<a href="https://static.someones.cn/images/ece20e1660d989b294be8c79255ec8a2d2bf77cd120d68da6a86231bbd2d2480.png">https://static.someones.cn/images/ece20e1660d989b294be8c79255ec8a2d2bf77cd120d68da6a86231bbd2d2480.png</a></p></blockquote><h1 id="前言"><a href="#前言" class="headerlink" title="前言"></a>前言</h1><p>本文针对Ubuntu系统，使用其他系统开发或不使用apt进行包管理，需要自行修改命令。<br>笔者使用bash作为默认shell环境。<br>在Ubuntu 18.04、Ubuntu 20.04、Ubuntu 22.04下测试通过。</p><h1 id="配置开发环境"><a href="#配置开发环境" class="headerlink" title="配置开发环境"></a>配置开发环境</h1><figure class="highlight shell"><table><tr><td class="gutter"><pre><span class="line">1</span><br><span class="line">2</span><br><span class="line">3</span><br><span class="line">4</span><br><span class="line">5</span><br></pre></td><td class="code"><pre><span class="line"><span class="meta prompt_"># </span><span class="language-bash">安装必要依赖</span></span><br><span class="line">sudo apt-get -y install wget gcc python3 python3-distutils build-essential uuid-dev iasl nasm</span><br><span class="line"><span class="meta prompt_"></span></span><br><span class="line"><span class="meta prompt_"># </span><span class="language-bash">设置默认python3为默认python命令</span></span><br><span class="line">sudo ln -s /usr/bin/python3 /usr/bin/python</span><br></pre></td></tr></table></figure><h3 id="（可选）配置交叉编译器"><a href="#（可选）配置交叉编译器" class="headerlink" title="（可选）配置交叉编译器"></a>（可选）配置交叉编译器</h3><p>如果需要编译与本机CPU架构不同的UEFI，需要配置对应的交叉编译工具。<br>以下示例是：X86平台编译AARCH64平台的UEFI</p><figure class="highlight shell"><table><tr><td class="gutter"><pre><span class="line">1</span><br><span class="line">2</span><br><span class="line">3</span><br><span class="line">4</span><br><span class="line">5</span><br><span class="line">6</span><br><span class="line">7</span><br><span class="line">8</span><br><span class="line">9</span><br><span class="line">10</span><br><span class="line">11</span><br></pre></td><td class="code"><pre><span class="line"><span class="meta prompt_"># </span><span class="language-bash">下载交叉编译器并解压</span></span><br><span class="line">wget https://releases.linaro.org/components/toolchain/binaries/7.5-2019.12/aarch64-linux-gnu/gcc-linaro-7.5.0-2019.12-x86_64_aarch64-linux-gnu.tar.xz</span><br><span class="line">tar axvf gcc-linaro-7.5.0-2019.12-x86_64_aarch64-linux-gnu.tar.xz</span><br><span class="line"><span class="meta prompt_"></span></span><br><span class="line"><span class="meta prompt_"># </span><span class="language-bash">解压得到一个文件夹：gcc-linaro-7.5.0-2019.12-x86_64_aarch64-linux-gnu</span></span><br><span class="line"><span class="meta prompt_"># </span><span class="language-bash">将文件夹里的bin目录加入环境变量</span></span><br><span class="line">export PATH=$PATH:$PWD/gcc-linaro-7.5.0-2019.12-x86_64_aarch64-linux-gnu/bin/</span><br><span class="line"><span class="meta prompt_"></span></span><br><span class="line"><span class="meta prompt_"># </span><span class="language-bash">设置交叉编辑工具前缀：</span></span><br><span class="line">export GCC5_AARCH64_PREFIX=aarch64-linux-gnu-</span><br><span class="line">export GCC49_AARCH64_PREFIX=aarch64-linux-gnu-</span><br></pre></td></tr></table></figure><h1 id="获取Edk2最新源代码"><a href="#获取Edk2最新源代码" class="headerlink" title="获取Edk2最新源代码"></a>获取Edk2最新源代码</h1><figure class="highlight shell"><table><tr><td class="gutter"><pre><span class="line">1</span><br><span class="line">2</span><br><span class="line">3</span><br><span class="line">4</span><br><span class="line">5</span><br><span class="line">6</span><br></pre></td><td class="code"><pre><span class="line"><span class="meta prompt_"># </span><span class="language-bash">克隆主仓库代码</span></span><br><span class="line">git clone https://github.com/tianocore/edk2.git</span><br><span class="line">cd edk2</span><br><span class="line"><span class="meta prompt_"></span></span><br><span class="line"><span class="meta prompt_"># </span><span class="language-bash">更新子模块代码</span></span><br><span class="line">git submodule update --init --recursive</span><br></pre></td></tr></table></figure><h3 id="（可选）获取C语言标准库代码"><a href="#（可选）获取C语言标准库代码" class="headerlink" title="（可选）获取C语言标准库代码"></a>（可选）获取C语言标准库代码</h3><p>以上代码不包含C语言标准库，如果需要使用C语言标准库，可以按照下面方法下载。<br>克隆edk2-libc仓库，复制AppPkg、StdLib、StdLibPrivateInternalFiles这3个文件夹到Edk2源代码目录。</p><figure class="highlight shell"><table><tr><td class="gutter"><pre><span class="line">1</span><br><span class="line">2</span><br><span class="line">3</span><br><span class="line">4</span><br><span class="line">5</span><br><span class="line">6</span><br></pre></td><td class="code"><pre><span class="line">git clone https://github.com/tianocore/edk2-libc.git</span><br><span class="line"></span><br><span class="line">cd edk2-libc</span><br><span class="line"><span class="meta prompt_"></span></span><br><span class="line"><span class="meta prompt_"># </span><span class="language-bash">变量EDK2_SRC_DIR为代码目录</span></span><br><span class="line">cp -a AppPkg StdLib StdLibPrivateInternalFiles $(EDK2_SRC_DIR)/</span><br></pre></td></tr></table></figure><h1 id="编译-运行"><a href="#编译-运行" class="headerlink" title="编译 &amp; 运行"></a>编译 &amp; 运行</h1><h3 id="准备工作"><a href="#准备工作" class="headerlink" title="准备工作"></a>准备工作</h3><ol><li>编译基本工具，一般情况下只需要编译一次。</li></ol><figure class="highlight shell"><table><tr><td class="gutter"><pre><span class="line">1</span><br><span class="line">2</span><br></pre></td><td class="code"><pre><span class="line"><span class="meta prompt_"># </span><span class="language-bash">代码根目录执行</span></span><br><span class="line">make -C BaseTools</span><br></pre></td></tr></table></figure><ol start="2"><li>加载开发环境，每个Shell环境都需要执行一次</li></ol><figure class="highlight shell"><table><tr><td class="gutter"><pre><span class="line">1</span><br><span class="line">2</span><br></pre></td><td class="code"><pre><span class="line"><span class="meta prompt_"># </span><span class="language-bash">代码根目录执行</span></span><br><span class="line">source edksetup.sh</span><br></pre></td></tr></table></figure><p>‍</p><h3 id="（可选）编译并运行模拟器"><a href="#（可选）编译并运行模拟器" class="headerlink" title="（可选）编译并运行模拟器"></a>（可选）编译并运行模拟器</h3><p>执行以下命令编译模拟器，下附编译成功图片。</p><figure class="highlight shell"><table><tr><td class="gutter"><pre><span class="line">1</span><br><span class="line">2</span><br><span class="line">3</span><br><span class="line">4</span><br><span class="line">5</span><br></pre></td><td class="code"><pre><span class="line"><span class="meta prompt_"># </span><span class="language-bash">编译模拟器</span></span><br><span class="line">EmulatorPkg/build.sh</span><br><span class="line"><span class="meta prompt_"></span></span><br><span class="line"><span class="meta prompt_"># </span><span class="language-bash">运行模拟器</span></span><br><span class="line">EmulatorPkg/build.sh run</span><br></pre></td></tr></table></figure><p>​<img src="https://static.someones.cn/images/5b0e5a99c71eb751e9993374e9304484d18f769899d0dc4a9f953a215bfcce64.png" alt="编译成功" title="编译成功" loading="lazy">​</p><p>执行以下命令，输入“run”运行</p><p>​<img src="https://static.someones.cn/images/4c5bf0ec98c65fc61d146e0d323459a413e982fdb227eeb9ece965ce3f4da638.png" alt="输入&quot;run&quot;运行" title="输入&quot;run&quot;运行" loading="lazy">​</p><p>​<img src="https://static.someones.cn/images/4e4888a5122dc34babede46d03063cf6d2457420c7ccc0e2cada5ab19180dfc8.png" alt="成功运行" title="成功运行" loading="lazy">​</p><p>‍</p><h3 id="（故障排除）基本工具编译失败"><a href="#（故障排除）基本工具编译失败" class="headerlink" title="（故障排除）基本工具编译失败"></a>（故障排除）基本工具编译失败</h3><p>可能是gcc版本过高，或者python版本不正确引起的。编译基本工具使用的是本机的gcc和python，与安装的交叉编译工具无关。</p><h4 id="gcc错误"><a href="#gcc错误" class="headerlink" title="gcc错误"></a>gcc错误</h4><p>可以尝试降级gcc，或者修改配置文件，下面提供修改配置文件的方法。</p><p>‍</p><h4 id="Python错误"><a href="#Python错误" class="headerlink" title="Python错误"></a>Python错误</h4><p>如果在“test_xxx”出错，一般是python脚本出错，这种情况推荐直接更换python版本。<br>不同的代码要求的pyhton版本不一样，暂时没有研究出版本对照表。</p><p>‍</p><h1 id="常见问题"><a href="#常见问题" class="headerlink" title="常见问题"></a>常见问题</h1><ul><li>推荐使用bash作为默认shell，使用其他的（如：zsh）可能出现一些奇怪的问题。</li><li>缺少X11 Lib或xext执行以下命令。<code>sudo apt-get install x11proto-xext-dev libxext-dev</code>​</li></ul>]]></content>


    <summary type="html">&lt;p&gt;图片版&lt;/p&gt;
&lt;blockquote&gt;
&lt;p&gt;​&lt;a</summary>


    <category term="Notes" scheme="https://someones.cn/categories/Notes/"/>
    
    
    <category term="UEFI" scheme="https://someones.cn/tags/UEFI/"/>
    
    <category term="BIOS" scheme="https://someones.cn/tags/BIOS/"/>
    
  </entry>
  
  <entry>
    <title>Java程序员都要懂得知识点：反射</title>
    <link href="https://someones.cn/2021/01/12/java-cheng-xu-yuan-dou-yao-dong-de-zhi-shi-dian-fan-she/"/>
    <id>https://someones.cn/2021/01/12/java-cheng-xu-yuan-dou-yao-dong-de-zhi-shi-dian-fan-she/</id>
    <published>2021-01-12T02:00:00.000Z</published>
    <updated>2023-09-26T07:07:58.082Z</updated>
    
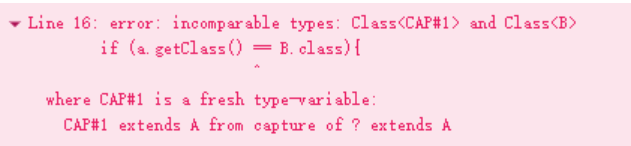
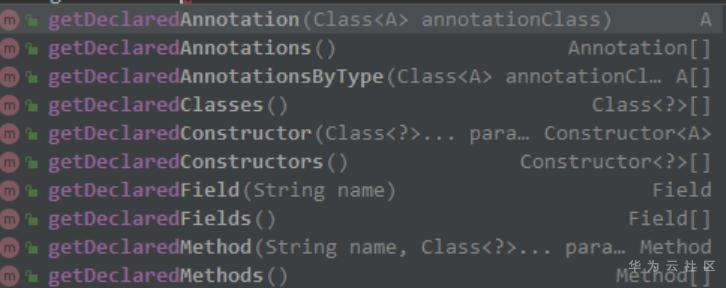
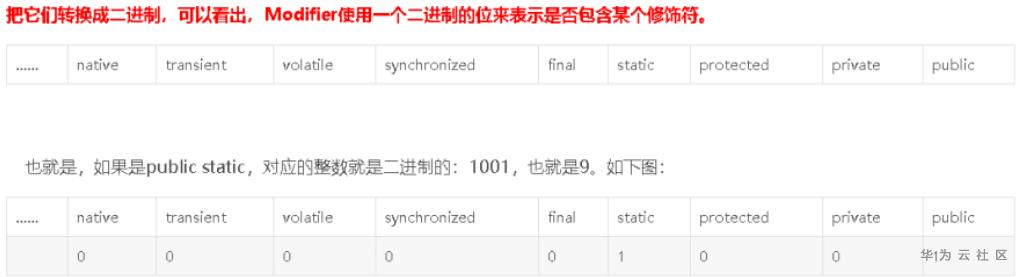
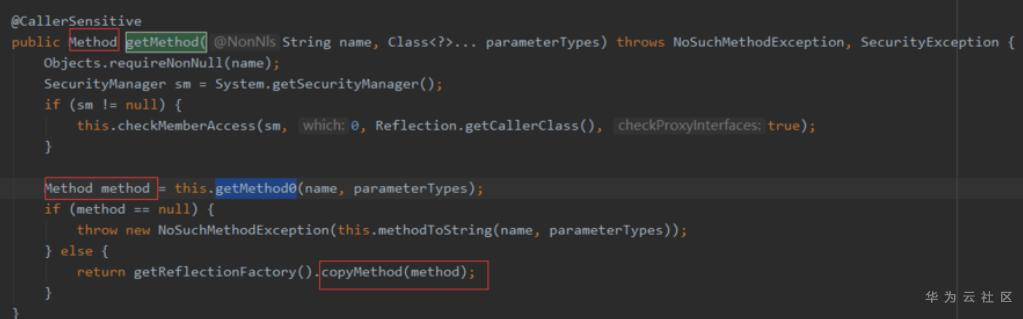
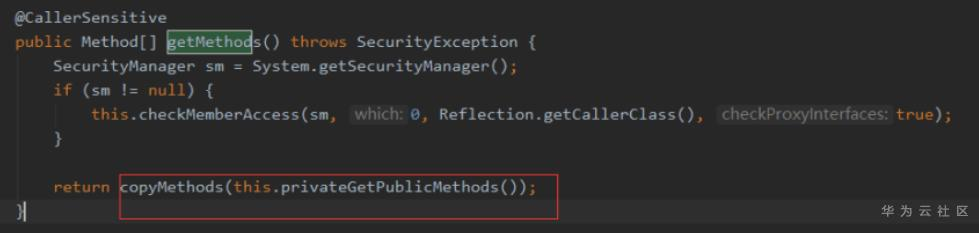
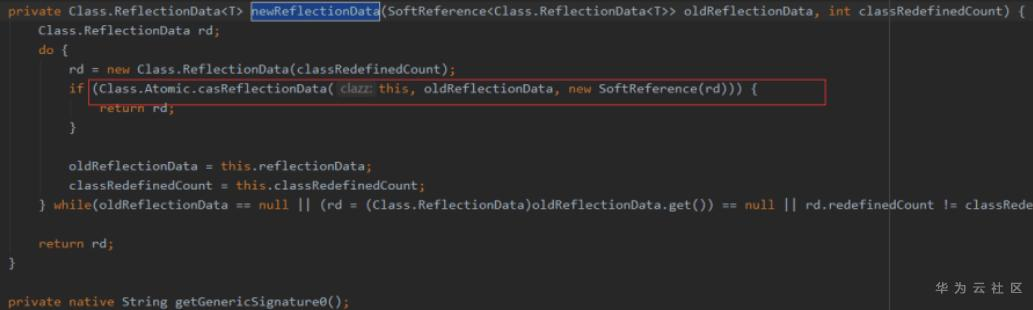
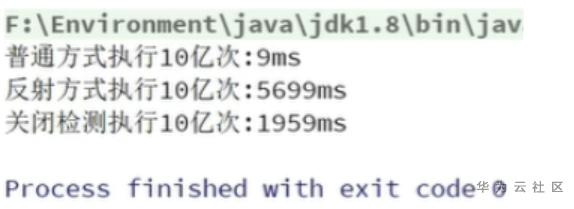
    <content type="html"><![CDATA[<p>Java反射机制是在运行状态中，对于任意一个类，都能够知道这个类的所有属性和方法；对于任意一个对象，都能够调用它的任意一个方法和属性；这种动态获取的信息以及动态调用对象的方法的功能称为java语言的反射机制。</p><p><strong>反射就是把java类中的各种成分映射成一个个的Java对象。</strong></p><p>例如：一个类有：成员变量、方法、构造方法、包等等信息，利用反射技术可以对一个类进行解剖，把个个组成部分映射成一个个对象。</p><p>（其实：一个类中这些成员方法、构造方法、在加入类中都有一个类来描述）</p><h2 id="反射"><a href="#反射" class="headerlink" title="反射"></a>反射</h2><p>Q： 调用类对象.class 和 forName(类名)的区别？</p><figure class="highlight java"><table><tr><td class="gutter"><pre><span class="line">1</span><br><span class="line">2</span><br></pre></td><td class="code"><pre><span class="line">Class&lt;A&gt; classA = A.class;</span><br><span class="line">Class&lt;A&gt; classA = Class.forName(<span class="string">&quot;A&quot;</span>);</span><br></pre></td></tr></table></figure><p>A： 仅使用.class不能进行第一次静态初始化， forname函数则可以</p><p>例如B是A的基类,下面这段代码如何？<br>假设有父子2个类，如下：</p><figure class="highlight java"><table><tr><td class="gutter"><pre><span class="line">1</span><br><span class="line">2</span><br><span class="line">3</span><br></pre></td><td class="code"><pre><span class="line"><span class="keyword">static</span> <span class="keyword">class</span> <span class="title class_">Parent</span> &#123; &#125;</span><br><span class="line"> </span><br><span class="line"><span class="keyword">static</span> <span class="keyword">class</span> <span class="title class_">Son</span> <span class="keyword">extends</span> <span class="title class_">Parent</span>&#123;&#125;</span><br></pre></td></tr></table></figure><p>Q： 用instanceof 可以和父类比较吗，且会返回true吗？</p><figure class="highlight java"><table><tr><td class="gutter"><pre><span class="line">1</span><br><span class="line">2</span><br><span class="line">3</span><br><span class="line">4</span><br></pre></td><td class="code"><pre><span class="line"><span class="type">Son</span> <span class="variable">son</span> <span class="operator">=</span> <span class="keyword">new</span> <span class="title class_">Son</span>();</span><br><span class="line"><span class="keyword">if</span> (son <span class="keyword">instanceof</span>  Parent) &#123;</span><br><span class="line">    System.out.println(<span class="string">&quot;a instanof B&quot;</span>);</span><br><span class="line">&#125;</span><br></pre></td></tr></table></figure><p>A： 可以比较，且返回true。</p><p>Q： 用getClass并用&#x3D;&#x3D; 可以和父类比较吗，且会返回true吗，下面这样：<br>注意A是B的子类。</p><figure class="highlight java"><table><tr><td class="gutter"><pre><span class="line">1</span><br><span class="line">2</span><br><span class="line">3</span><br><span class="line">4</span><br></pre></td><td class="code"><pre><span class="line"><span class="type">Son</span> <span class="variable">son</span> <span class="operator">=</span> <span class="keyword">new</span> <span class="title class_">Son</span>();</span><br><span class="line"><span class="keyword">if</span> (son.getClass() == Parent.class)&#123;</span><br><span class="line">    System.out.println(<span class="string">&quot;son class == Parent.class&quot;</span>);</span><br><span class="line">&#125;</span><br></pre></td></tr></table></figure><p>A： 不可以，编译就会报错了。和Class&lt;泛型&gt;的 &#x3D;&#x3D;号比较有关。</p><p><img src="https://static.someones.cn/blog/java-cheng-xu-yuan-dou-yao-dong-de-zhi-shi-dian-fan-she/1.png" alt="1616810095068062903.png" loading="lazy"></p><p>因为getClass返回的是&lt;? extends Son&gt;， .class返回的是Class<Parent></p><p>Q： 用getClass并用.equals可以和父类比较吗，且会返回true吗，下面这样：</p><figure class="highlight java"><table><tr><td class="gutter"><pre><span class="line">1</span><br><span class="line">2</span><br><span class="line">3</span><br><span class="line">4</span><br></pre></td><td class="code"><pre><span class="line"><span class="type">Son</span> <span class="variable">son</span> <span class="operator">=</span> <span class="keyword">new</span> <span class="title class_">Son</span>();</span><br><span class="line">       <span class="keyword">if</span> (son.getClass().equals(Parent.class))&#123;</span><br><span class="line">           System.out.println(<span class="string">&quot;son class.equals(Parent.class)&quot;</span>);</span><br><span class="line">       &#125;</span><br></pre></td></tr></table></figure><p>A： 可以比较，正常编译， 但是会返回false，即不相等！</p><p>Q： getDeclaredXXX 有哪几种？<br>A： 5种：<br>注解Annotation<br>内部类Classed<br>构造方法Construcotor<br>字段Field<br>方法Method</p><p><img src="https://static.someones.cn/blog/java-cheng-xu-yuan-dou-yao-dong-de-zhi-shi-dian-fan-she/2.png" alt="1616810106986007259.png" loading="lazy"></p><p>Q：getMethods()返回哪些方法， getDeclaredMethods()会返回哪些方法？</p><p>A：<br>getMethods()返回 本类、父类、父接口 的public方法<br>getDeclaredMethods()只 返回本类的 <strong>所有</strong> 方法</p><p>其他getXXX和getDeclaredXXX的区别同理。</p><p>拿到Filed、Method、Constructor之后咋用</p><ul><li>Method可以invoke（object， args）</li><li>Constructor可以newInstance(Object…)来做构造调用。</li><li>Filed可以用get(object)、set(object)来设置属性值。</li></ul><p>Q： 反射拿到Method对象后， 该对象.getModifiers() 是干嘛的？<br>A： 返回该方法的修饰符，并且是1个整数。</p><p><img src="https://static.someones.cn/blog/java-cheng-xu-yuan-dou-yao-dong-de-zhi-shi-dian-fan-she/3.png" alt="1616810116021009939.png" loading="lazy"></p><p>Q：<br>下面这段代码会发生什么？</p><figure class="highlight java"><table><tr><td class="gutter"><pre><span class="line">1</span><br><span class="line">2</span><br><span class="line">3</span><br><span class="line">4</span><br><span class="line">5</span><br><span class="line">6</span><br><span class="line">7</span><br><span class="line">8</span><br><span class="line">9</span><br><span class="line">10</span><br><span class="line">11</span><br><span class="line">12</span><br><span class="line">13</span><br><span class="line">14</span><br><span class="line">15</span><br><span class="line">16</span><br><span class="line">17</span><br><span class="line">18</span><br><span class="line">19</span><br></pre></td><td class="code"><pre><span class="line"><span class="keyword">package</span> com.huawei.test</span><br><span class="line"> </span><br><span class="line"><span class="keyword">public</span> <span class="keyword">class</span> <span class="title class_">A</span> &#123;</span><br><span class="line">    <span class="keyword">public</span> <span class="title function_">A</span><span class="params">(<span class="type">int</span> i )</span> &#123;</span><br><span class="line">        System.out.printf(<span class="string">&quot;i=&quot;</span> +i);</span><br><span class="line">    &#125;</span><br><span class="line"> </span><br><span class="line">    <span class="keyword">public</span> <span class="keyword">static</span> <span class="keyword">void</span> <span class="title function_">main</span><span class="params">(String[] args)</span> &#123;</span><br><span class="line">        <span class="keyword">try</span> &#123;</span><br><span class="line">            <span class="type">A</span> <span class="variable">a</span> <span class="operator">=</span> (A)Class.forName(<span class="string">&quot;com.huawei.test.A&quot;</span>).newInstance();</span><br><span class="line">        &#125; <span class="keyword">catch</span> (ClassNotFoundException e) &#123;</span><br><span class="line">            System.out.printf(<span class="string">&quot;ClassNotFoundException&quot;</span>);</span><br><span class="line">        &#125; <span class="keyword">catch</span> (InstantiationException e) &#123;</span><br><span class="line">            System.out.printf(<span class="string">&quot;InstantiationException&quot;</span>);</span><br><span class="line">        &#125; <span class="keyword">catch</span> (IllegalAccessException e) &#123;</span><br><span class="line">            System.out.printf(<span class="string">&quot;IllegalAccessException&quot;</span>);</span><br><span class="line">        &#125;</span><br><span class="line">    &#125;</span><br><span class="line">&#125;</span><br></pre></td></tr></table></figure><p>A:<br>打印InstantiationException初始化错误。因为A没有默认构造器了，所以不可以用newInstance来构造。应该改成这样,通过获取正确的构造器来进行构造。</p><figure class="highlight java"><table><tr><td class="gutter"><pre><span class="line">1</span><br></pre></td><td class="code"><pre><span class="line"><span class="type">A</span> <span class="variable">a</span> <span class="operator">=</span> (A)Class.forName(<span class="string">&quot;A&quot;</span>).getConstructor(<span class="type">int</span>.class).newInstance(<span class="number">123</span>);</span><br></pre></td></tr></table></figure><p>Q：如何提高反射的效率？<br>A：</p><ul><li>使用高性能反射包，例如ReflectASM</li><li>缓存反射的对象，避免每次都要重复去字节码中获取。（缓存！缓存！）<br>method反射可设置method.setAccessible(true)来关闭安全检查。</li><li>尽量不要getMethods()后再遍历筛选，而直接用getMethod(methodName)来根据方法名获取方法</li><li>利用hotspot虚拟机中的反射优化技术（jit技术）<blockquote><p>参考资料： <br><a href="https://segmentfault.com/q/1010000003004720">https://segmentfault.com/q/1010000003004720</a><br><a href="https://www.cnblogs.com/coding-night/p/10772631.html">https://www.cnblogs.com/coding-night/p/10772631.html</a></p></blockquote></li></ul><p>Q：<br>用反射获取到的method对象， 是返回一个method引用，还是返回1个拷贝的method对象？</p><p>A：<br>反射拿method对象时， 会做一次拷贝，而不是直接返回引用，因此最好对频繁使用的同一个method做缓存，而不是每次都去查找。</p><p><img src="https://static.someones.cn/blog/java-cheng-xu-yuan-dou-yao-dong-de-zhi-shi-dian-fan-she/4.png" alt="1616810152127031226.png" loading="lazy"></p><p>Q:<br>getMethods()后自己做遍历获取方法，和getMethod(methodName) 直接获取方法， 为什么性能会有差异？<br>A：<br>getMethods() 返回method数组时，每个method都做了一次拷贝。 getMethod(methodName)只会返回那个方法的拷贝， 性能的差异就体现在拷贝上。</p><p><img src="https://static.someones.cn/blog/java-cheng-xu-yuan-dou-yao-dong-de-zhi-shi-dian-fan-she/5.png" alt="1616810160296062066.png" loading="lazy"></p><p>Q:<br>获取方法时，jvm内部其实有缓存，但是返回给外部时依然会做拷贝。那么该method的缓存是持久存在的吗？<br>A:<br>不是持久存在的，内存不足时会被回收。源码如下：</p><p><img src="https://static.someones.cn/blog/java-cheng-xu-yuan-dou-yao-dong-de-zhi-shi-dian-fan-she/6.png" alt="6e3ed6ce8ed068b6643e00a928c84c3f.png" loading="lazy"></p><figure class="highlight java"><table><tr><td class="gutter"><pre><span class="line">1</span><br><span class="line">2</span><br><span class="line">3</span><br><span class="line">4</span><br><span class="line">5</span><br><span class="line">6</span><br><span class="line">7</span><br></pre></td><td class="code"><pre><span class="line"><span class="keyword">private</span> Class.ReflectionData&lt;T&gt; <span class="title function_">reflectionData</span><span class="params">()</span> &#123;</span><br><span class="line">    SoftReference&lt;Class.ReflectionData&lt;T&gt;&gt; reflectionData = <span class="built_in">this</span>.reflectionData;</span><br><span class="line">    <span class="type">int</span> <span class="variable">classRedefinedCount</span> <span class="operator">=</span> <span class="built_in">this</span>.classRedefinedCount;</span><br><span class="line">    Class.ReflectionData rd;</span><br><span class="line">    <span class="keyword">return</span> reflectionData != <span class="literal">null</span> &amp;&amp; (rd = (Class.ReflectionData)reflectionData.get()) != <span class="literal">null</span></span><br><span class="line">    &amp;&amp; rd.redefinedCount == classRedefinedCount ? rd : <span class="built_in">this</span>.newReflectionData(reflectionData,     classRedefinedCount);</span><br><span class="line">&#125;</span><br></pre></td></tr></table></figure><p><img src="https://static.someones.cn/blog/java-cheng-xu-yuan-dou-yao-dong-de-zhi-shi-dian-fan-she/7.png" alt="ebb41805004f2fe31705996cd159acb2.png" loading="lazy"></p><p>可以看到这是一个软引用。</p><p>软引用的定义：内存紧张时可能会被回收，不过也可以通过-XX:SoftRefLRUPolicyMSPerMB参数控制回收的时机，只要发生GC就会将其回收。</p><p>如果reflectionData被回收之后，又执行了反射方法，那只能通过newReflectionData方法重新创建一个这样的对象了。</p><p>Q： 反射是线程安全的吗?<br>A:<br>是线程安全的。 获取反射的数据时，通过cas去获取。</p><p><img src="https://static.someones.cn/blog/java-cheng-xu-yuan-dou-yao-dong-de-zhi-shi-dian-fan-she/8.png" alt="1616810186202053338.png" loading="lazy"></p><p>Q:<br>a普通方法调用<br>b反射方法调用<br>c关闭安全检查的反射方法调用，性能差异如下：</p><p><img src="https://static.someones.cn/blog/java-cheng-xu-yuan-dou-yao-dong-de-zhi-shi-dian-fan-she/9.png" alt="1616810195773033845.png" loading="lazy"></p><p>b反射方法调用和c关闭安全检查的反射方法调用的性能差异在哪？普通方法调用和关闭安全检查的反射方法调用的性能差异在哪？</p><p>A:<br>1.安全检查的性能消耗在于:<br>SecurityManager.checkPermission(SecurityConstants.CHECK_MEMBER_ACCESS_PERMISSION); 这项检测需要运行时申请RuntimePermission(“accessDeclaredMembers”)。 所以如果不考虑安全检查， 对反射方法调用invoke时， 应当设置 Method#setAccessible(true)</p><p>2.普通方法和反射方法的性能差异在于</p><ul><li>Method#invoke 方法会对参数做封装和解封操作</li><li>需要检查方法可见性</li><li>需要校验参数</li><li>反射方法难以内联</li><li>JIT 无法优化</li></ul><blockquote><p>原文链接：<a href="https://bbs.huaweicloud.com/blogs/252114">https://bbs.huaweicloud.com/blogs/252114</a></p></blockquote>]]></content>


    <summary type="html">&lt;p&gt;Java反射机制是在运行状态中，对于任意一个类，都能够知道这个类的所有属性和方法；对于任意一个对象，都能够调用它的任意一个方法和属性；这种动态获取的信息以及动态调用对象的方法的功能称为java语言的反射机制。&lt;/p&gt;
&lt;p&gt;&lt;strong&gt;反射就是把java类中的各种成分映</summary>


    <category term="其他" scheme="https://someones.cn/categories/%E5%85%B6%E4%BB%96/"/>
    
    
    <category term="java" scheme="https://someones.cn/tags/java/"/>
    
  </entry>
  
  <entry>
    <title>Android与数据流的斗争</title>
    <link href="https://someones.cn/2020/12/01/android-yu-shu-ju-liu-de-dou-zheng/"/>
    <id>https://someones.cn/2020/12/01/android-yu-shu-ju-liu-de-dou-zheng/</id>
    <published>2020-12-01T11:00:00.000Z</published>
    <updated>2023-09-26T07:11:30.466Z</updated>
    
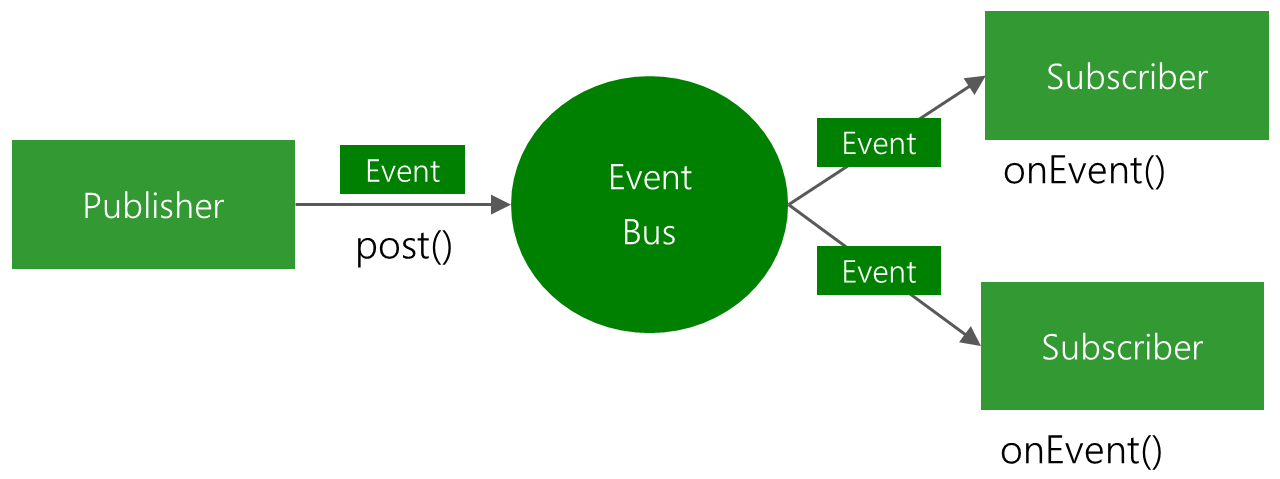
    <content type="html"><![CDATA[<p>目前 Android 开发，从广义上来说可以划为前端的一部分，毕竟大部分 Android 开发所做的工作就是从服务器获取数据，将这些数据用合适的方式展示给用户，再把用户操作产生的数据传递给服务器。在这样的情境下 Android 开发所需要解决的一个核心问题就是数据的传递，如何把服务器与页面内容关联起来，并且保持同步。相信对于这一过程，每一个工程师都有自己的解决方案。这一个过程看似简单，但真正想要将其比较完美的实现，却也需要花费一番功夫。</p><h2 id="蛮荒时代"><a href="#蛮荒时代" class="headerlink" title="蛮荒时代"></a>蛮荒时代</h2><p>在 Android 开发还未成熟，处于蛮荒时期的时候，没有成型方案作为参考，此时比较常见的做法就是在 Activity 里创建线程，在线程内发送网络请求，之后用 Handler 把请求结果传递到主线程，主线程收到信息后更新页面，这种方式缺陷是十分明显的，它会造成 Activity 十分臃肿，随着项目的发展会变成一团乱麻。</p><h2 id="网络库"><a href="#网络库" class="headerlink" title="网络库"></a>网络库</h2><p>后来出现了诸多成型的网络的封装库，因此网络请求的核心逻辑就不在 Activity 中了，这为 Activity 减轻了不少负担，但是此时又一个问题出现了，那就是如何从请求库获取网络请求的返回结果，此时大多数网络库都采用了一个最容易想到的方案，那就是 Callback，Activity 发出请求时会得到一个 Callback，并通 Callback 回调得到最终的网络请求结果。</p><h2 id="数据层"><a href="#数据层" class="headerlink" title="数据层"></a>数据层</h2><p>但是网络请求问题解决了，但是很快另一个问题又成了比较困扰的内容，例如：网络请求得到的结果并不能直接使用，需要进行一些数据的转换，又或者网络请求并不需太高的实时性，请求一次后需要缓存起来，避免多次重复请求。这样在 Activity 中就需要一些数据转换操作，或者进行一些数据库相关的操作，很快 Activity 又会变得臃肿起来。</p><p>为了避免在 Activity 中直接进行这些操作而变得臃肿，很多人不得不在网络请求和 Activity 之间封装一个数据层，Activity 向数据层请求数据，数据层根据需要从网络或者数据库获取数据并且对数据进行转换，然后交给 Activity。此时数据需要如何传递呢？</p><figure class="highlight plaintext"><table><tr><td class="gutter"><pre><span class="line">1</span><br></pre></td><td class="code"><pre><span class="line">Activity &lt;--callbac-1-- 数据层 &lt;--callback-2-- 网络请求</span><br></pre></td></tr></table></figure><p>通常来说需要 Activity 向数据层发送请求时附带一个 Callback，而数据层直接向网络发出请求时又是另外一个 Callback，需要把数据从一个 Callback 传递到另一 Callback，当然这是对于一些比较简单的业务，如果业务更加复杂一点，可能会划分更多的层和节点，那么就不仅仅是两个 Callback 了，数据需要多在多个 Callback 之间流动，Callback 太多就会导致逻辑不是那么清晰，当项目大到一定程度时，里面的各种 Callback 就能把人绕晕。</p><h2 id="EventBus"><a href="#EventBus" class="headerlink" title="EventBus"></a>EventBus</h2><p>为了解决错综复杂的 Callback 问题，EventBus 诞生了，它的核心其实就是发布订阅模式，当 Activity 需要获取一些信息时，发送一个事件(Event), 数据层接收到 Event 后执行相关操作，之后同样通过发送 Event 告诉 Activity 最终的结果。此时各个组件之间不需要再去关心各种错中复杂的数据传递方式，只需要把需要传递的数据包装成一个个的 Event 再通过 EventBus 发送出去，如果需要相关的事件的话，就在合适的位置注册一下监听该事件。</p><p><img src="https://static.someones.cn/blog/android-yu-shu-ju-liu-de-dou-zheng/EventBus-Publish-Subscribe.png" alt="EventBusPublishSubscribe.png" loading="lazy"></p><p>所谓事件总线，就是把所有的事件都通过一个地方进行传递，这个和计算机硬件上的总线原理类似，因此也就被称为“事件总线”，在我最初接触到这种思想时，确实也被惊艳了一下，这种方式在一定程度上解决了过多 Callback 的问题，让代码看起来更加简洁了。</p><p>但是这种方式也并不是完美无缺的，它的确让代码更加简洁了，但是它将数据传递的过程隐藏起来了，相当于切断了数据流的追踪线路，增大了数据流追踪的难度，如果整个项目都是自己设计或者一开始就参与的问题倒是不大，但是如果是接手别人的项目是这样设计的，那么接手的人很可能会一脸懵逼。</p><p>例如：我需要当前的用户的信息，也知道通过哪个 Event 来接收这一信息，但是我发现接收到的信息有时是错误的，因此我需要找到发送该信息的位置并修改这一错误，这时就比较麻烦了，因为所有信息都是通过 EventBus 发送的，但我无法通过 EventBus 直接追踪到发送位置，因此我需要找到该 Event ，并追踪这个 Event 都被哪些地方使用了，然后从这些地方中筛选出时哪里发送了这个错误信息，对于一个庞大的项目来说，这一工作量无疑是巨大的，假若前人在多个地方都发送了这一个 Event，我则需要对所有发送过这个 Event 的地方都进行检查，这会浪费大量的工作时间。因此在实际的公司项目上我很少采用 EventBus 这一方案，尽管它很好用，但是这一点缺陷就足以致命。</p><h2 id="数据流"><a href="#数据流" class="headerlink" title="数据流"></a>数据流</h2><p>正在我纠结到底如何传递数据时，Rx 技术方案就出现在了我的面前，Rx 的核心思想就是响应式编程，即一种面向数据流和变化传播的编程范式，数据更新是相关联的。 这种思想和 Linux 中的管道也是类似的，数据从一个地方进入转换后输出，而这个输出恰好是另一段处理的输入，就这样把数据串联起来。</p><p><img src="https://static.someones.cn/blog/android-yu-shu-ju-liu-de-dou-zheng/DataTransform.jpg" alt="DataTransform.jpg" loading="lazy"></p><p>这是一个简单的例子，将一个空白的圆通过两步转换变成我们所需要的样子，数据从一个位置流向另一个位置，并不断的变化。<br>Rx 核心之一就是数据流，包括 Java8 中也有引入类似的流式思想。</p><p>响应式这一思想并不算特别新颖，不过是这种思想近些年才被人用代码实现出来具备了商用能力而已，随着 RxJava 技术的成熟，目前我参与的项目中所有的数据获取基本都是通过 RxJava 进行处理的。并且基于 RxJava 提供的强大操作符和线程调度能力，确实也算解决了一大难题。</p><p>相比于 EventBus 这种形式，这种方案最重要的还是数据流的可追踪性，还是上面的例子，如果我发现了最终的结果有错误，那么我只需要跟随着这条数据链不断的向上追踪，并逐一环节的进行检查即可，很快就能找到问题的根源所在。就目前而言，这种方式还是不错的，尤其是配合 Java8 的一些新特性使用，相当爽快。</p><p>如果想要了解这一思想的运用方式，个人推荐看 《RxJava的官方文档》和 《Java8 实战》，看完这些基本就可以理解响应式编程中数据流这一思想了。</p><h2 id="LiveData"><a href="#LiveData" class="headerlink" title="LiveData"></a>LiveData</h2><p>LiveData 是 Google 最近推出的一种技术方案，它需要配合 Lifecycle 来使用，它解决的问题核心不是数据传输的问题，而是生命周期。我们都知道网络传输是比较慢的，而且具有不确定性，因此 Android 不允许其在主线程中执行，必须另开线程，在线程中获得结果后通过一些方式将结果告诉主线程，主线程并根据这些信息进行更新，正是因为网络返回时间的不确定性导致了一个问题的发生，当网络结果返回时，可能需要这一结果的页面已经不存在了。</p><p>例如：在我打开一个 activity 时发起了一个网络，网络请求的结果会更新 activity 里面的内容，但是在我发起请求后我不想要这个结果了，直接点击返回键把 activity 关闭了，如果我在关闭 activity 时忘记了取消这次网络请求，那么它在一段时间后就可能会返回结果，并在返回结果里面尝试去更新一些已经被销毁的 View，就会产生异常，导致程序崩溃。</p><p>为了避免这些问题的出现我们不得不在代码里面添加很多安全检查，每当有类似的情况出现都需要安全检查，于是核心的业务逻辑就可能被淹没在了诸多的安全检查中。</p><p>为了解决这一问题，Lifecycle 和 LiveData 就出现了，其实在 Lifecycle 出现之前，就有采用类似思想的技术方案出现，但是 Lifecycle 是 Google 官方推出的内容，在 support 包里面的很多组件已经默认支持了 Lifecycle，因此使用 Lifecycle 和 LiveData 会更加的简便。</p><p>在引入的 LiveData 后，基本的项目结构就变成下面这样了：</p><p><img src="https://static.someones.cn/blog/android-yu-shu-ju-liu-de-dou-zheng/BasicStructure.jpg" alt="BasicStructure.jpg" loading="lazy"></p><p>这只是一个简略的结构，在实际的项目中使用时肯定是比这个要复杂的，需要根据具体的业务需求选择不同的技术方案。</p><p>在经过上述的几次演变后，Activity 的工作量大大的减轻了，网络、数据库、一部分安全检查逻辑都被从 Activity 中移除了，Activity 只需要绑定一下 View，并控制一下显示内容就可以了，因此会看起来特别的简洁，如果配合 Butterknife 和 Dagger2 来使用的话，会更加简洁，不过这两个内容并不在本文的讨论范围内，因此也就不展开叙述了。</p><p>以上提到的相关技术，并没有详细的说明，若比较感兴趣，可以自己查询关键词去详细的了解一下。</p><blockquote><p>原文链接:<a href="https://www.gcssloop.com/gebug/android-stream.html">https://www.gcssloop.com/gebug/android-stream.html</a></p></blockquote>]]></content>


    <summary type="html">&lt;p&gt;目前 Android 开发，从广义上来说可以划为前端的一部分，毕竟大部分 Android 开发所做的工作就是从服务器获取数据，将这些数据用合适的方式展示给用户，再把用户操作产生的数据传递给服务器。在这样的情境下 Android</summary>


    <category term="其他" scheme="https://someones.cn/categories/%E5%85%B6%E4%BB%96/"/>
    
    
    <category term="android" scheme="https://someones.cn/tags/android/"/>
    
  </entry>
  
  <entry>
    <title>We need a safer systems programming language</title>
    <link href="https://someones.cn/2020/04/05/we-need-a-safer-systems-programming-language/"/>
    <id>https://someones.cn/2020/04/05/we-need-a-safer-systems-programming-language/</id>
    <published>2020-04-05T12:00:00.000Z</published>
    <updated>2023-09-26T07:10:04.484Z</updated>
    
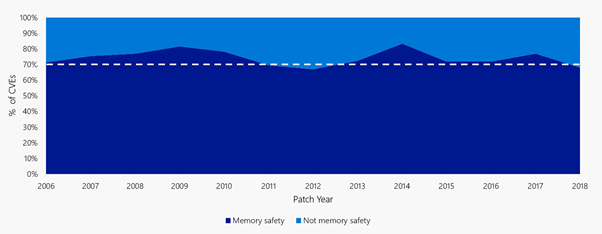
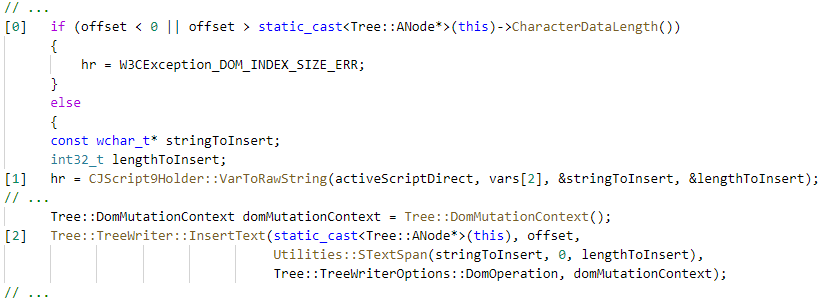
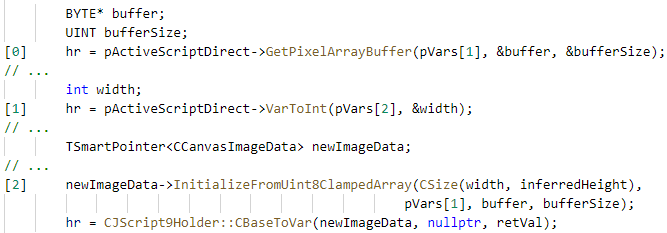
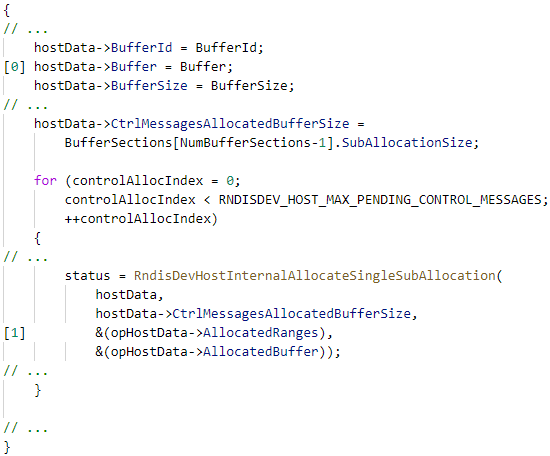
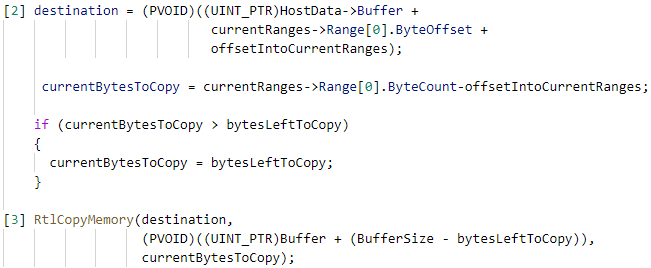
    <content type="html"><![CDATA[<p>In our first post in this series, we discussed the need for proactively addressing memory safety issues. Tools and guidance are demonstrably not preventing this class of vulnerabilities; memory safety issues have represented almost the same proportion of vulnerabilities assigned a CVE for over a decade. We feel that using memory-safe languages will mitigate this in ways that tools and training have not been able to.</p><p>In this post, we’ll explore some real-world examples of vulnerabilities found in Microsoft products (after testing and static analysis) that could be prevented by using a memory-safe language.</p><h2 id="Memory-Safety"><a href="#Memory-Safety" class="headerlink" title="Memory Safety"></a>Memory Safety</h2><p>Memory safety is a property of programming languages where all memory access is well defined. Most programming languages in use today are memory-safe because they use some form of garbage collection. However, systems-level languages (i.e., languages used to build the underlying systems other software depends on, like OS kernels, networking stacks, etc.) which cannot afford a heavy runtime like a garbage collector are usually not memory-safe.</p><p>As was pointed out in our previous post, the root cause of approximately 70% of security vulnerabilities that Microsoft fixes and assigns a CVE (Common Vulnerabilities and Exposures) are due to memory safety issues. This is despite mitigations including intense code review, training, static analysis, and more.</p><p><img src="https://static.someones.cn/blog/we-need-a-safer-systems-programming-language/1.png" alt="image1.png" loading="lazy"><br>~70% of the vulnerabilities Microsoft assigns a CVE each year continue to be memory safety issues</p><p>While many experienced programmers can write correct systems-level code, it’s clear that no matter the amount of mitigations put in place, it is near impossible to write memory-safe code using traditional systems-level programming languages at scale.</p><p>Let’s look at some real-life examples of security vulnerabilities that have been caused by the use of languages without a memory safety guarantee.</p><h2 id="Spatial-memory-safety"><a href="#Spatial-memory-safety" class="headerlink" title="Spatial memory safety"></a>Spatial memory safety</h2><p>Spatial memory safety refers to ensuring that all memory accesses are within bounds of the type that is being accessed. Doing this requires code to both track these sizes and correctly check all memory operations against these sizes.</p><p>Checks can either be absent for an edge case of control flow or can be implemented incorrectly due to not accounting for the intricacies of integer sign, integer promotion, or integer overflow. Let’s consider this example from Microsoft Edge, found by Alexandru Pitis (CVE-2018-8301):</p><p><img src="https://static.someones.cn/blog/we-need-a-safer-systems-programming-language/code1.png" alt="code1.png" loading="lazy"></p><p>The check at [0] is correct. However, [1] can modify the size of the string invalidating the retrieved offset. The function at [2] calls a copy function which ends up being different than the expected offset, triggering an exploitable out of bounds write.</p><p>The fix for this vulnerability is easy: move the “offset check” closer to the time of use. The problem is that this is very error-prone in complex code bases and a simple refactor of the code could open this vulnerability again. Modern C++ offers span to enforce bounds checked array accesses. Unfortunately, it is not the default, and so it is the responsibility of the developer to opt into using it. In practice, enforcing the usage of such constructs is difficult.</p><p>If the language could automatically track and verify sizes for us, we as programmers would no longer need to worry about having to implement these checks correctly, and we could be certain that none of these issues exist in our code.</p><h2 id="Temporal-memory-safety"><a href="#Temporal-memory-safety" class="headerlink" title="Temporal memory safety"></a>Temporal memory safety</h2><p>Temporal memory safety refers to ensuring that pointers still point to valid memory at the time of dereference.</p><p>A common use-after-free pattern comes from taking a reference to some memory in a local pointer, executing a complex series of operations that could result in freeing or moving the memory, making the local pointer become stale, and then dereferencing it when it is no longer valid. Consider this source code example from Edge found by Steven Hunter (CVE-2017-8596):</p><p><img src="https://static.someones.cn/blog/we-need-a-safer-systems-programming-language/code2.png" alt="code2.png" loading="lazy"></p><p>This bug is possible because of how many complex APIs interact with each other and the programmer not being able to enforce ownership of memory throughout the codebase. At [0], the program gets a pointer to a buffer owned by a JavaScript object. Then at [1], because of the language complexity, to get another variable, it might execute more JavaScript code. At [2], it will use the buffer and width to create a new JavaScript object with the contents of that pointer.</p><p>The problems are:</p><p>The program uses a combination of garbage collection and manual memory management. The garbage collector tracks the JavaScript objects but it doesn’t know if there is a pointer to an internal part of the object<br>Because VarToInt reenters into JavaScript, the JS program can modify the state and clear the owner of the pointer it aliased at [1]<br>The vulnerability is similar to an iterator invalidation bug where all the pointers to the internal state of JavaScript might become dangling if the state is modified. This issue can be solved in many ways. However, statically proving that this error does not happen again is nearly impossible in programs as complex as browsers. The root of the problem comes from aliasing pointers that point to mutable state. C and C++ do not have the tools to enforce the prevention of such errors. However, it’s recommended to always use “smart pointers” for tracking memory ownership.</p><h2 id="Data-races"><a href="#Data-races" class="headerlink" title="Data races"></a>Data races</h2><p>A data race occurs when two or more threads in a single process concurrently access the same memory location, at least one of the accesses is for writing, and the threads are not using any exclusive locks to control their accesses to that memory. When considering shared data across multi-threaded execution, keeping spatial and temporal memory safety becomes even more difficult and error prone. Even small windows of time of unsynchronized memory sharing might allow another thread to modify data that can be used to reference memory. This allows, among other things, time-of-check vs time-of-use vulnerabilities that trigger spatial and temporal memory safety vulnerabilities</p><p>Jordan Rabet’s VMSwitch vulnerability, presented at Blackhat 2018, shows one potential impact of a data race. This code is called when a virtual machine sends a specific message to the host. This means that it can be called in parallel to the processing of other control messages and packets. This is problematic because the handlers for those control messages use information that is modified without any locking being done [0].</p><p><img src="https://static.someones.cn/blog/we-need-a-safer-systems-programming-language/code3.png" alt="code3.png" loading="lazy"></p><p>Looking at the next snippet, which is used for several control message completion handlers, we can see how the information being updated is used:</p><p><img src="https://static.someones.cn/blog/we-need-a-safer-systems-programming-language/code4.png" alt="code4.png" loading="lazy"></p><p>Due to this unsynchronized access, it’s possible for the new buffer base to be used with the old opHostData-&gt;AllocatedRanges [1] values, leading to an out-of-bounds write [3].</p><p>Preventing these types of vulnerabilities requires locking the data structures accessed by different threads for the time necessary to complete its processing. However, there is no easy way to statically enforce checks for these types of vulnerabilities in C++.</p><h2 id="What-We-Can-Do-About-it"><a href="#What-We-Can-Do-About-it" class="headerlink" title="What We Can Do About it"></a>What We Can Do About it</h2><p>Addressing the issues highlighted above required taking several different measures. “Modern” constructs in C++ like span<T> can prevent at least some classes of memory safety issues, and other modern C++ features such as smart pointers should be used wherever possible. However, modern C++ is still not completely memory-safe and data-race free. What’s more, usage of such features relies on programmers always “doing the right thing” which in large and ambiguous codebases may be impossible to enforce. C++ also lacks good tools for wrapping unsafe code in safe abstractions meaning while it might be possible to enforce correct coding practices on a local level, it can prove extremely difficult to build software components in C or C++ that compose safely.</p><p>Beyond this, whenever possible software should eventually be moved to a completely memory-safe language like C# or F# that ensure memory safety through runtime checks and garbage collection. After all, you should only incur the complexity of having to think about memory management when necessary.</p><p>If there are legitimate reasons for needing the speed, control and predictability of a language like C++, see if you can move to a systems-level programming language that is memory safe. In our next post, we’ll explore why we think the Rust programming language is currently the best choice for the industry to adopt whenever possible due to its ability to write systems-level programs in a memory-safe way.</p><blockquote><p>原文出处：<a href="https://msrc-blog.microsoft.com/2019/07/18/we-need-a-safer-systems-programming-language/">https://msrc-blog.microsoft.com/2019/07/18/we-need-a-safer-systems-programming-language/</a></p></blockquote>]]></content>


    <summary type="html">&lt;p&gt;In our first post in this series, we discussed the need for proactively addressing memory safety issues. Tools and guidance are</summary>


    <category term="其他" scheme="https://someones.cn/categories/%E5%85%B6%E4%BB%96/"/>
    
    
    <category term="language" scheme="https://someones.cn/tags/language/"/>
    
  </entry>
  
</feed>